As part of my test with the Canon 5d camera i also tried to develop a workflow for Image based lighting, using HDR images from a mirrored chrome ball to obtain photorealistic 3d lighting that match the live conditions. Using that you can insert any 3d object with proper modeling and materials into the scene and they will fit in quite photorealisticly.
Chrome balls are your friend:

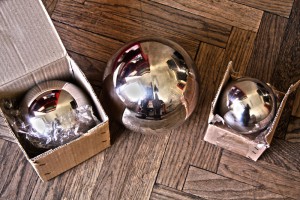
After some research people tend to use chromed balls from garden supplies shops quite a lot. I first got one that did not have a perfect surface, but luckily ma uncle is a landscape and garden designer who just got a brand new shipping of those chrome balls in all kinds of sizes and flavors up to mirror balls with almost 80 cm in diameter. I got myself one with 15 cm and another handy one with 10 cm, additionally to the old one i used for the test.
For shooting you have to do a serious of photos with different exposures which should be lined up exactly. By using different exposures of the image, you can extend the lattitude of the image, using 32 bit float for storing all the information. You can use those in Photoshop or HDRshop to combine them together to get a high dynamic range image. The whole point of this exercise is to capture the light intensity, with superwhites included in order to get a proper reference of the lighting conditions. The mirrorball is used to get an environment map, from that the light can be projected back onto the geometry. Using a mirrorball has some drawbacks, because light from the back of the ball can barely be measured and image quality degrades towards the edges of the ball. Also you would have to paint out the reflexion of you + camera from the image. There´s also other ways like fisheye lenses, stitching shots together and special rigs like the “Spheron camera”.
Example of a extracted Chrome ball image
3d Software setup:
The tricky part in this whole operation is getting the setup right in your 3d software. I´m not going too much into the details here, but in 3d Studio max it´s a combination of Mip rayswitscher, mip camera map, the environment/chromeball shader in the environment map and the matte shadow material in order to get proper shadowing and colors on the surroundings in the video using dummy objects that receive those shadows. All is done using the mental ray rendering engine.
The mip Rayswitcher is important to switch between a high resolution chromball image for reflections and a blurred smaller version for the lighting. As for lighting a blurred smaller version is preferrable, because a non blurred version with high details can give you problems, because of sampling issues.
Some other issues come into play like correctly applying a proper linear workflow throughout all your materials and also another setup that produces a renderpass that is usable for compositing, instead of just getting a rendering which combines the 3d objects with the background without any further options of tweaking.
Examples:
Example for a processed mirrorball image:

Here are some examples, where i just wanted to check how applicable this is for different light situations using (basic) matchmoving. What i found helpful at times was to paint out the sun itself from the Chrome ball, so that you get the ambient lighting from the environment, which final gather can handle quite well and then use a non physical light as a keylight in order to mimic the light of the sun. Those shots come directly out of the renderer, i did not do any compositing, in production i would have rendered out some passes in order to get further control for shadows, motion blur and the 3d objects themselves.
Material test:
The main goal was to test how different materials in mental ray hold up with the obtained HDRI lighting.
Heavy backlighting:
In this shot I wanted to test some difficult backlighting.
Cg integration:
Where can i obtain the same chrome balls? Its impossible to find those.. Could you please give me the website? Where can i buy from? Thank you.. K.
Hi,
thank you for your question:
personally i found mine in a garden center / shop.
The quality and price varies quite a bit, but i found them sufficient for my needs. (for lighting you don´t need that much of quality and resolution) for accurate reflections, this could be an issue.
The shop where i boght mine does not offer international shipping, after some research, here are some psosibilities to buy.
I did not test these, so i can´t tell the quality, but this might get you started:
www.amazon.com/Rome-712-S-Stainless-Polished-Diameter/dp/B001949T1W/ref=lp_3742351_1_4?ie=UTF8&qid=1359370682&sr=1-4
www.gazingballoutlet.com/?gclid=COvshsj0ipkCFR0Sagod7A8pnw
Modulor.de
www.salemball.com/index.htm
good luck, and all the best…
“Julia’s Garland” (fr. Guirlande de Julie)
among them acquired “Moral
(palimpsests). In the XIII-XV centuries in